Building and decorating gingerbread houses can be a fun family holiday activity. A couple of Christmases ago, I bought prebuilt gingerbread kits for a family Christmas activity. The grandkids were paired with an aunt or uncle and it was a great opportunity for each child and adult to get to know each other better. They still talk about the house they decorated together.
This year I did some gingerbread cottage building with four of our granddaughters. I pre-baked two gingerbread cottages and some cookies. The kids built and decorated the cottages and then used graham wafers, pretzels, marshmallows, candies and icing to create imaginative winter scenes. We all had great fun.
Gingerbread cookie dough
Everyone in the family gives this dough a big thumbs up! It was adapted from a Canadian Living recipe from 1990.
Yield: four cookie cottages and 12 gingerbread people.
- 1 c. butter, softened 250 mL
- 1 c. granulated sugar 250 mL
- 2 eggs
- 3/4 c. fancy molasses* 175 mL
- 1/2 c. cooking molasses* 125 mL
- 6 c. all-purpose flour 1.5 L
- 1 tsp. baking soda 5 mL
- 1 tsp. salt 5 mL
- 2 tsp. ground ginger 10 mL
- 1 tsp. ground cloves 5 mL
- 1 tsp. cinnamon 5 mL
For decorating gather a variety of small, colourful candies, pretzels, marshmallows, gum drops, icing glazes and sugar sprinkles.
In large bowl, beat butter and sugar until light using an electric mixer, beat in eggs, add molasses, and beat until well mixed.
In a separate bowl, stir together flour, baking soda, salt, ginger, cloves and cinnamon or blend in a flour sifter or sieve. Use a wooden spoon and gradually stir dry ingredients into molasses mixture. Mix well, working with hands if necessary.
Divide dough into four discs patted down to about half an inch thick, wrap each in plastic wrap and refrigerate for at least two hours until firm, or for up to one week.
*Different types of molasses
During the refining process of sugar beets and sugar cane the juice squeezed from the plants is boiled to a syrupy mixture from which the sugar crystals are extracted. The remaining brownish-black liquid is molasses.
Light molasses comes from the first boiling of the sugar syrup and is lighter in both flavour and colour. It is often used as a pancake or waffle syrup. In Canada it is sold as “fancy molasses.”
Cooking molasses comes from a second boiling and is darker, thicker and less sweet.
Blackstrap molasses, from the third boiling, is very thick, dark and somewhat bitter, with a much stronger flavour. Fancy and Blackstrap molasses combined in equal amounts will give the flavour of cooking molasses.
Rolling the dough
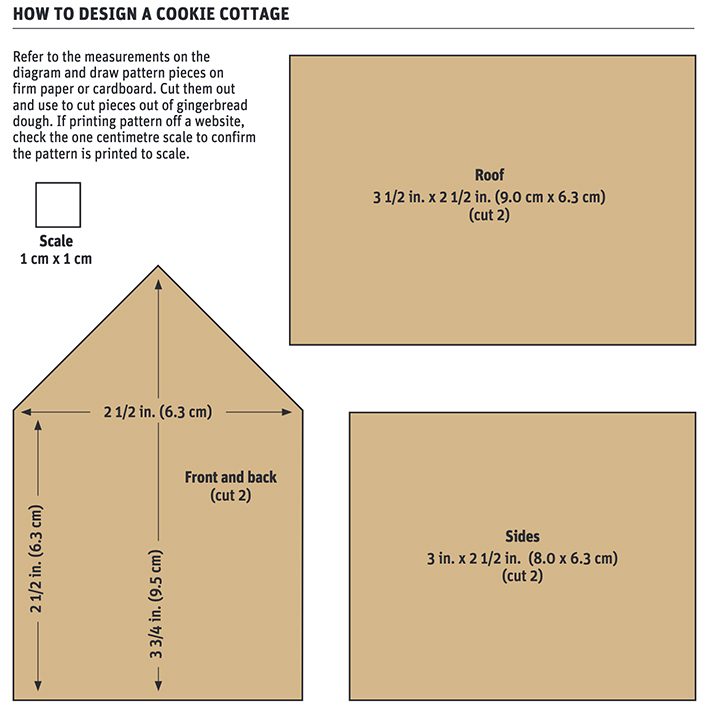
While the dough is cooling create cookie cottage pattern pieces on firm paper or cardboard. Refer to the measurements in the diagrams.
Place a large rimless cookie sheet or cutting board on counter. A damp tea towel underneath will prevent it from moving while rolling dough. Place a piece of parchment paper on cookie sheet, put one portion of dough on parchment and spread plastic wrap over dough to prevent rolling pin from sticking to dough.
Roll out dough to an even one-quarter-inch thickness. Lightly flour dough so pattern pieces won’t stick to dough. Place pattern pieces on dough, cut around patterns with a sharp knife or pizza cutter. Gently lift excess dough away from cut out sections, cover scraps to reroll later.
Gently lift pieces on parchment paper to a second cookie sheet for baking, leaving at least one inch between pieces. Cut parchment apart if necessary to move pieces farther apart. Place cookie sheet in freezer for 20 minutes to chill dough.
With remaining scraps, make more cottage pieces. Be sure to have two end walls, two side walls and two roof sections for each cottage. With extra dough create a chimney, shutters and other architectural details or use cookie cutters to make gingerbread people, snowpeople, trees or snowflakes. Place these on a separate parchment lined cookie sheet and chill before baking.
Bake one sheet at a time in preheated 350 F (180 C) oven for eight- 12 minutes for smaller cookies and 12-15 minutes for cottage pieces, or until the cookies springs back when lightly touched.
Remove from oven and immediately replace cottage patterns on dough. Cut around edges to trim off excess cookie to give straight edges for building later.
Cool three to four minutes or until cookies begin to firm up. Carefully move to wire rack and cool completely.
Once cooled, place in a container with a tight-fitting lid, use parchment between layers.
Use to make cottages in one to two days or freeze for longer storage.
Just before assembling cookie cottages, make royal icing. This icing will quickly dry hard and acts like glue to hold cottage pieces together.
Royal icing
- 6 tbsp. pasteurized, refrigerated egg whites or equivalent* 90 mL
- 1/2 tsp. cream of tartar 2 mL
- 4 c. (1 lb.) unsifted icing sugar 1 L
- food colouring (optional)
*Because the icing will be eaten raw, it is recommended that pasteurized egg whites be used, they are sold in the egg cooler section. Meringue powder works just as well, use 1/4 cup (60 mL) meringue powder combined with 1/2 cup (125 mL) cold water to replace egg whites. Meringue powder is sold with cake decorating supplies.
In large bowl, whip egg whites and cream of tartar until foamy. Sprinkle sugar in gradually while whipping. The more icing is whipped the stiffer it will be and faster it will harden up.
To “paint” with icing, scoop some into a small bowl add food colouring and a few drops of water to thin icing. Use a paint brush to apply.
Royal icing needs to be kept covered, or it will dry and become lumpy. The easiest way to store icing is in a plastic pastry bag or zip-top food storage bag.
Insert decorating tip coupler into pastry bag before adding icing.
To fill pastry bag, roll large opening over to create a cuff, place bag point-end down into a large, narrow glass, rolling cuff over the edge, scoop icing in until two-thirds full. Place bag on counter and use a rubber spatula on outside of bag to push icing to tip end. Roll the end up to the icing and clip with a clothes pin or paper clamp. Fill a zip-top bag the same way, then zip shut. Cut just the tip off a lower corner to squeeze icing out of. Small zip-top plastic bags work perfectly for small amounts of coloured icing. Cover tips with damp paper towel when not using. For longer storage, place decorating bags in plastic bag, seal and refrigerate.
Make a base for the cottages from sturdy cardboard, a minimum of eight x 10 inches (20 x 25 cm) or larger if planning to have more than one cottage on the board. Wrap with foil.
Assembling
Decide on cottage placement on the board. Beginning with back panel of cottage, squeeze a wide strip of icing onto bottom edge, position on base and prop upright with spice jars for two to three minutes or until icing hardens.
To add sides, squeeze icing on lower edge of side piece and side edge that will be against back panel. Align pieces at a right angle, making sure they are as tight as possible, using spice jars as support. A cereal box is a good guide to ensure a 90-degree angle at the corners. Repeat with other side.
For added stability, squeeze icing along inside and outside edges of all pieces and corners. Allow icing to dry two to three minutes then add cottage front panel, adding extra icing along front and corners. Once dry, remove spice jars props.
To assemble roof, work one side at a time. Squeeze a generous amount of icing along top edges of right side of cottage and carefully place a single roof panel on top. Align it so upper edge of roof meets the centre of the cottage and evenly space the overhang at front and back.
Add extra icing as needed. Use a prop (or recruit another set of hands) to hold up roof while it dries. Repeat with other side of roof. Allow structure to dry for at least 20-30 minutes before adding decorations.
During this time, add snow to area around cottage or decorate trees, people or snowmen.
For a chimney use a serrated knife to cut cookies at an angle to align to roof, attach with icing and hold in place to dry.
For graham wafer cottages, assemble the same way or use a small cardboard cream carton as a frame and icing wafers to sides and fill corner spaces with icing and candies. This is easier for younger builders.
Add candies, icing and sprinkles to decorate the cookie cottages and yards. Just remember there are no rules, let the creativity flow and have fun.
Merry Christmas.
Betty Ann Deobald is a home economist from Rosetown, Sask., and a member of Team Resources. Contact: team@producer.com.