Summer brings more time with the kids, whether your own or visiting grandchildren.
One of the easiest ways to entertain them on hot summer days is to make cool summer treats.
Head to the garden to pick berries or go to the farmers market, fruit truck or grocery store for fresh fruit. Then share the creations with other family members.
Read Also

Vintage power on display at Saskatchewan tractor pull
At the Ag in Motion farm show held earlier this year near Langham, Sask., a vintage tractor pull event drew pretty significant crowds of show goers, who were mostly farmers.
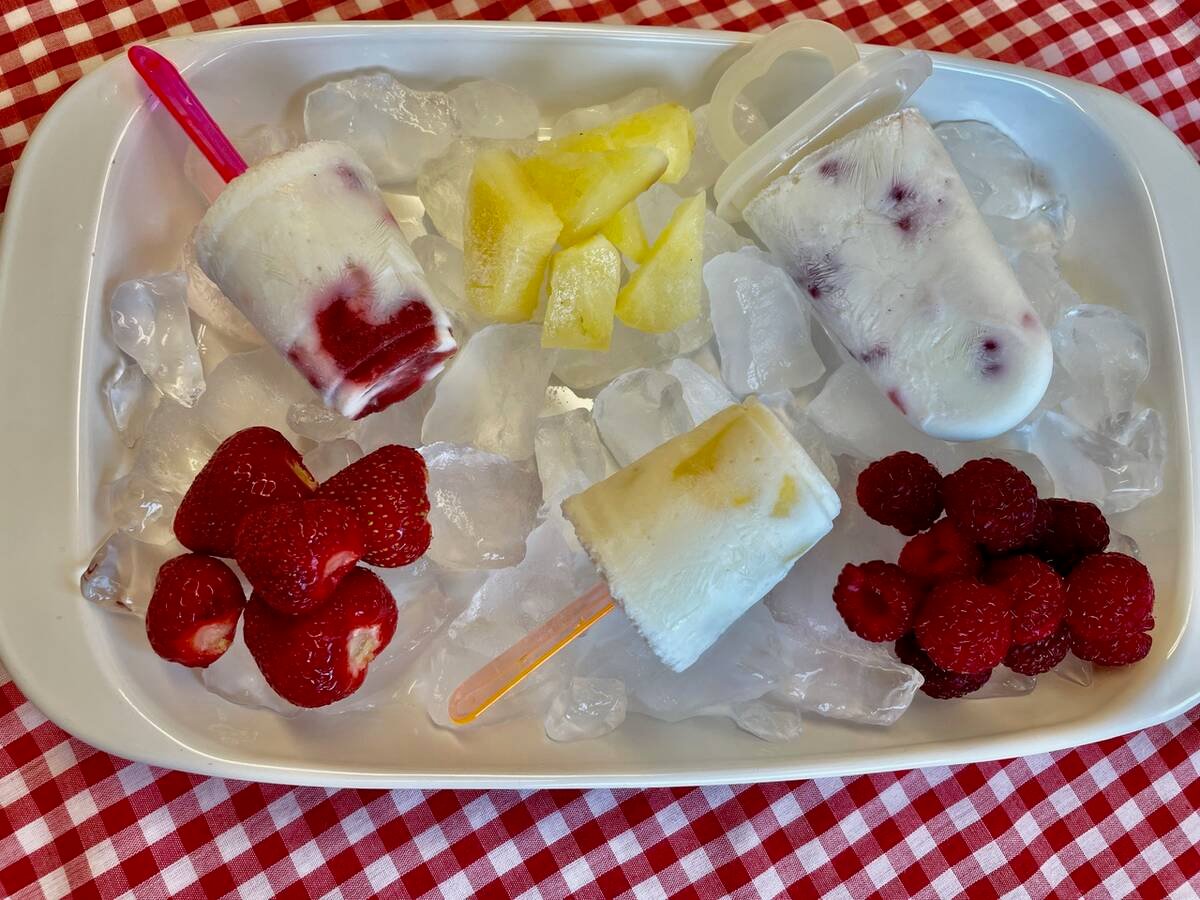
Fruit and yogurt popsicles
Yields 10 to 12 popsicles.
The recipe can easily be doubled.
These popsicles are made with lactose-free milk and yogurt, so are perfect for those who can’t tolerate milk, while everyone else will also enjoy them.
If there are no lactose intolerant concerns, use regular milk and yogurt.
The blend of fruit, yogurt and milk makes a refreshing, flavourful treat.
- 1/2 c. cold 3.5% M.F. homogenized lactose free milk125 mL
- 1 c. lactose free 0 M. F. Greek yogurt (plain or vanilla)250 mL
- 3 tbsp. honey, or to taste45 mL
- 1 1/2 c. fresh or frozen fruit, use one fruit or several to make a variety of flavours; possibilities are blueberries, grapes, raspberries, strawberries, pineapple, kiwi, peaches or bananas 375 mL
- other additions could be chocolate chips, chopped Oreos or chopped brownies
- Using a whip, combine yogurt and milk until smooth and creamy. Warm the honey until it will drip easily. Slowly drizzle honey into milk mixture, using the whip to combine. After each tablespoon of honey, taste to determine desired sweetness.
- Dry the popsicle moulds very well or ice crystals will form on the popsicles. Use a thin cloth and a meat skewer to dry the moulds.
- Chop fruit and place a tablespoon full in the bottom of a mould, add milk mixture to within about a half inch of the top, add more fruit, stir slightly to mix. Tamp down the mixture to fill in any holes and then tap the popsicles against the counter to pop any air bubbles.
- Add lids with popsicle sticks, fill additional moulds and transfer to the freezer. Freeze for at least four hours before enjoying.
- To remove popsicles from their moulds, allow to stand at room temperature for five minutes or run under cool water. Don’t rush the process or they’ll melt.
Note: Small plastic cups can be used as popsicle moulds. Place in a muffin pan, fill and then carefully wrap in foil. Insert a popsicle stick or gelato spoon through the foil into the centre of the cup and then freeze.
Raspberry ice cream
Yield: six to eight small servings.
Who doesn’t like ice cream on a hot summer day? What is even better is making your own ice cream.
I purchased a ball ice cream maker several years ago and we have made many cold treats with it.
An alternative is to put the ice cream mixture into a sealable plastic bag and then place into a large coffee can. Kids and adults alike will have great fun rolling either the ice cream ball or coffee can back and forth to make ice cream.
- 1 c. fresh or frozen raspberries, partially thawed250 mL
- 1/2 c. sugar125 mL
- 1 c. heavy whipping cream250 mL
- 1/2 c. half-and-half cream125 mL
- 6 c. ice cubes1.5 L
- 1/4-1/2 c. pickling salt or other coarse salt60-125 mL
- extra berries for garnish
- Place raspberries in a blender; cover and pulse until chopped. Transfer to a large bowl; stir in sugar until dissolved. Stir in creams until blended.
- Pour mixture into ice cream ball and seal lid. Add ice and salt to the other side and seal lid.
- Alternatively, place the ice cream mixture in a medium size sealable plastic bag, squeeze to remove the air and seal the bag.
- Place into a second sealable plastic bag and seal, or place mixture in a plastic jar in which fruit is sold.
- Put a large plastic bag into a large coffee can, add the ice cream mixture container, fill the coffee can with ice and add 1/4 cup (60 mL) of salt. Close can lid.
- Roll the ball or can back and forth on the floor, deck or lawn for about 10 minutes, check to see if the ice cream is freezing, stir to distribute ice crystals, close container and add more ice and salt if needed. Continue to roll for another five to 10 minutes. Enjoy the cool treat in the shade.
Adapted from tasteofhome.com.
Limonana
This is an Israeli fresh mint lemonade. The name is a combination of the Hebrew words for lemon (limon) and mint (nana).
The refreshing lemon mint drink is perfect for sipping in the shade.
Serves one.
Contains 68 kilocalories.
- 1 lemon
- 8 -10 fresh mint leaves
- 2 tsp. sugar, or to taste10 mL
- 1 c. cold water250 mL
- ice cubes
- sprig of mint to garnish (optional)
- Wash the lemon thoroughly. Remove some of the peel with a zester to use as a garnish.
- Juice the lemon and discard any pits. Put lemon juice, mint leaves and sugar into a blender and pulse a few times until the mint leaves are well chopped. Add water and pulse again to mix. Taste and add more sugar if necessary.
- Fill a tall glass with ice cubes and pour the lemon-mint-water mixture over. Garnish with a mint leaf or some lemon zest and serve at once.
- Slush option: In a blender, combine lemon juice, fresh mint leaves, sugar and ice cubes and 3/4 cup of water. Pulse for a few seconds and then blend for one minute till the ice is thoroughly crushed and the drink takes on the texture of a thick slushy.
- Taste and add more sugar if desired. Serve in a cold, short glass with a sprig of mint or lemon zest.
Adapted from: family-friends-food.com.
Edible fruit flowerpot
This is a fun way for kids to express their creativity as well as enjoying fresh fruit, all while making a pretty decoration for a family gathering.
- 12 large strawberries, with green leaves attached
- 1/4 c. white cream chips60 mL
- 1/4 c. semi-sweet chocolate chips60 mL
- 30 seedless green grapes
- 30 seedless red grapes
- 1 pineapple
- other fruits as desired or available
- large clean clay flowerpot or vase
- dry floral foam
- tin foil
- wooden skewers
- leaf lettuce or leafy kale
- Scrub flowerpot well and allow to dry. When dry, insert a dry floral foam block into the pot to create a base and cut off foam about an inch above the top of the pot. Use extra pieces of foam to fill in spaces to secure the foam, cutting as necessary. Cut off corners of foam to slightly round the top. Use a piece of foil to cover foam, pushing foil edges down inside the pot. Lay a leaf of lettuce or kale over foil and over edge of pot.
- Wash and dry fruit. Do not remove green leaves from strawberries.
- Put half of chocolate chips in a small microwaveable dish and half of cream chips in a second dish. Place both dishes in microwave for 10 second intervals to melt, stirring after each interval. Don’t overheat.
- Insert a wooden skewer through stem end of a strawberry and twirl in chocolate to cover berry, using a spoon if needed. Allow excess chocolate to drip off.
- Using a small spoon, drizzle white cream over the chocolate. Place dipped strawberry skewer in a tall glass and place in refrigerator to set chocolate. Alternate dipping strawberries into the white cream first and drizzle with the chocolate. Add more chips and remelt as needed.
- Make undipped strawberries if desired and lay on a tray.
- Select five grapes of similar size and insert wooden skewer through the stem to create a skewer of grapes. Repeat, making several grape skewers. Lay skewers on tray with strawberries.
- Cut top and bottom off pineapple and then slice pineapple into about half inch circles. Using a sharp knife, cut a daisy-like shape from the pineapple circles, avoiding the pineapple eyes. If available, a large cookie cutter could be used.
- Insert a wooden skewer into the centre core of the pineapple daisy, and where the skewer exits the pineapple, add a grape to create a centre.
- As pineapple flowers are made, cut the bottom end of the wooden skewer at an angle, with scissors, to create a sharp point to make insertion through the leaf, foil and foam. Space out pineapple flowers in the arrangement at different heights and angles.
- Add strawberry and grape skewers, cutting the skewers to create different heights to fill spaces in the arrangement.
- Place in a cool place, such as a cooler with some ice until ready to enjoy.
Explore more farm-fresh recipes and culinary insights from Betty Ann Deobald.